
Endoscopy Essentials: Upper Gastrointestinal Endoscopy Techniques, Part 2
As originally published in Today's Veterinary Practice," March/April 2015 (Volume 5, Number 2)
Julie Callahan Clark, DVM, Diplomate ACVIM
University of Pennsylvania
Welcome to our newest column in Today’s Veterinary Practice—Endoscopy Essentials. Similar to our Imaging Essentials column, which addresses radiography by anatomic location, each article in this column will discuss endoscopic evaluation of a specifi c body system, reviewing indications, disease abnormalities, and proper endoscopic technique. The Endoscopy Essentials articles are archived at
Upper gastrointestinal endoscopy (UGIE) is a minimally invasive procedure that can:
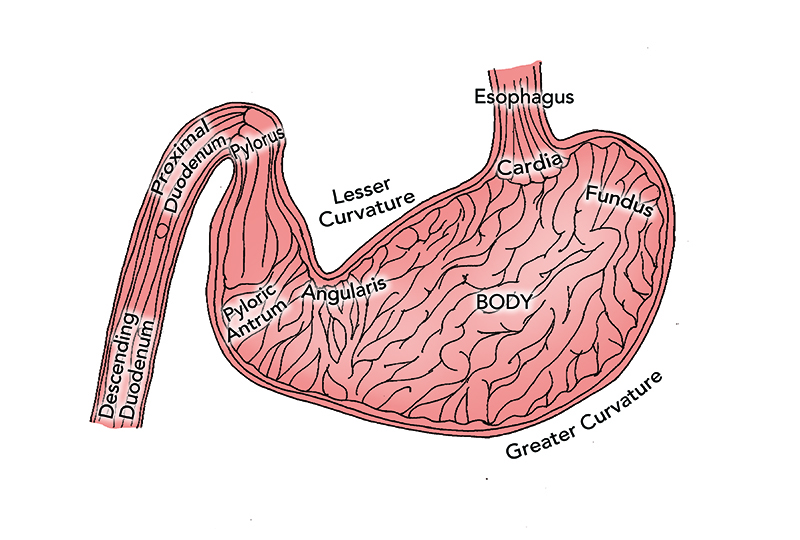
- Aid in the diagnostic evaluation of clinical signs referable to the esophagus, stomach, and proximal small intestine (Figure 1)
- Obtain biopsy samples as part of the diagnostic evaluation of a pet with chronic gastrointestinal (GI) signs.
The first part of this article—Part 1: Overview of Upper Gastrointestinal Endoscopy (November/December 2014 issue)—reviewed indications for UGIE techniques, appearance of healthy GI tissue, and abnormalities of the upper GI tract.
This article will discuss patient and equipment preparation and provide step-by-step instructions on how to perform:
- Esophagoscopy
- Gastroscopy
- Enteroscopy.
PATIENT PREPARATION
Prior to Procedure
Withhold food for 24 hours prior to elective UGIE to improve visualization of the mucosa and reduce risk for aspiration. If a UGIE must be performed on a more emergent basis and the presence of food or debris is compromising the field of view, the endoscopist should instill flush through the endoscope channel. If this is not sufficient, gastric lavage can be attempted using a large bore gastric tube and warm water. In these cases, the best defense against the development of aspiration pneumonia is to ensure that the endotracheal tube cuff is fully inflated and that the endotracheal tube is only removed once the patient is fully awake and able to protect its airway. Patients should undergo a 24-hour washout period if sucralfate has been administered or a barium contrast study performed.
Anesthesia & Monitoring
General anesthesia is required, and a qualified individual should be dedicated to monitoring the patient throughout the procedure.
- Position the patient in left lateral recumbency to facilitate entrance into the pylorus and duodenum.
- Ensure the endotracheal tube cuff is well inflated to help reduce risk of aspiration.
- Place a mouth gag to facilitate passage of the insertion tube and protect the endoscope (in case the patient unexpectedly recovers jaw tone during the procedure).
- Be mindful that anticholinergic drugs (eg, atropine) and pure mu opioids (eg, morphine, fentanyl) can increase pyloric tone, making entrance into the duodenum more difficult.
EQUIPMENT CONSIDERATIONS
Gastroscope Selection
- Select the largest diameter and longest length gastroscope that the patient can accommodate:
- Most dogs: 100 to 140 cm length, with 9.8 mm diameter
- Small dogs and cats: 100 to 140 cm length, with 7.8 mm diameter
- Instrument channel diameter is of high importance; I recommend a 2.8 mm or larger channel that can accommodate larger biopsy forceps.
Gastroscope Preparation
Ensure that the scope selected has functional 4-way tip deflection and that insufflation, irrigation, and suction functions are working appropriately. These functions can be tested by depressing the:
- Insufflation/irrigation valve partially, with the distal tip of the insertion tube in a bowl of water; insufflation should yield bubbles
- Suction valve; then watching as water is drawn into the suction canister
- Insufflation/irrigation valve completely, with the scope’s tip directed at your hand; a fine spray of water for irrigation should be visualized or felt against the skin.
During the Procedure
During the procedure, keep the following close by:
- Bowl of water in case the tip of the scope becomes occluded and/or the lens becomes soiled
- Clean gauze in order to remove material from the lens as needed.
Beware: Gastric Overinflation
The anesthetist should monitor for evidence of gastric overinflation, which can reduce venous return and/or lead to a vasovagal response. Signs include:
- Overt gastric distension
- Increased or decreased heart rate
- Changes in respiratory pattern
- Hypotension.
If gastric overinflation is suspected, the endoscopist should immediately suction air from the stomach.
GENERAL TECHNIQUE GUIDELINES
- Frequently insufflate air to maintain an open lumen, but be mindful of overinsufflation.
- With rare exception, only advance the insertion tube when there is clear visualization. Never apply significant pressure in a forward direction without visualization.
- If the lens becomes soiled, clean it by:
- Irrigation
- Gently passing the lens of the scope along the mucosa
- Withdrawing the scope and suctioning water through the insertion tube, followed by gently wiping the lens with clean gauze.
- If GI motility is deterring progress, pause, and once the wave of motility passes, resume forward motion.
- When experiencing a red out (when the operator’s field of view consists only of pinkish/red mucosa), or when unsure of location, back up until you are reoriented in the center of a lumen.
- Use of the deflection control knobs—located on the handpiece—or rotation of the endoscopist’s wrists can alter scope direction/orientation.
- Slow and steady movements are preferable to quick movements.
| Indications for Upper Gastrointestinal Endoscopy | |
| TYPE OF ENDOSCOPY | INDICATIONS |
| Esophagoscopy |
|
| Gastroscopy |
|
| Enteroscopy |
|
ESOPHAGOSCOPY
- Before beginning, make sure the patient’s head and neck are extended and the insertion tube is lubricated.
- Advance the insertion tube through the oropharynx, directing dorsal to the endotracheal tube.
- The cervical esophageal sphincter (CES) may be visualized and is easily intubated with gentle pressure. Once in the cervical esophagus, pause to insufflate the lumen, allowing it to distend for adequate visualization.
- To achieve adequate insufflation, occasional assistance is required to occlude the midesophagus at the thoracic inlet.
- A few deflection adjustments are required to traverse the length of a normal esophagus; attempt to remain in the center of the lumen for optimal visualization of the mucosa.
- The procedure is complete when the lower esophageal sphincter (LES) is visualized. Typically the LES is a closed, slit-like opening, eccentrically located; it may partially open in response to short puffs of air.
What You Will See: Esophagoscopy
- Normal esophageal mucosa is pale pink, smooth, and glistening (Figure 2).
Figure 2. Normal esophagus and lower esophageal sphincter in a dog.
- In cats, the caudal thoracic esophagus has circular rings, which denote the section comprised of smooth muscle.
- In dogs, the cervical esophagus has longitudinal mucosal folds that disappear when the lumen is fully insufflated.
- In both species, note the outline of the:
- Trachea in the ventral wall of the esophagus
- Aorta in the midthoracic esophagus.
GASTROSCOPY
Standardized Approach
The novice endoscopist should establish a standardized approach to UGIE.
- To enter the stomach, align the tip of the insertion tube with the center of the LES.
- Insufflate and gently advance the scope until the gastric rugal folds are visualized (Figure 3).
FIGURE 3. Canine gastric body partially insufflated; note the normal rugal folds traversing the gastric body.
- Once in the stomach, pause to insufflate, allowing the rugal folds to separate and flatten for improved visualization.
- Within seconds, the gastric body and greater curvature are in view.
- Use the rugal folds as a guide, advance the gastroscope parallel to the folds, further into the gastric body and, ultimately, to the antrum.
- As you approach the area of the lesser curvature, fewer rugal folds will be noted.
Complete Evaluation
When performing a UGIE, the operator must decide whether to do a complete gastric evaluation now or reserve it until enteroscopy is complete. Many endoscopists recommend advancing through the pylorus quickly because—once the stomach is fully insufflated—pyloric tone increases, making entrance more difficult.
Regardless of when it is performed, complete evaluation should include identification of the following landmarks, using these steps:
- Gastric body: Use 4-way tip deflection to achieve panoramic views of the gastric mucosa.
- Angularis incisura, Antrum, & Cardia: Once the scope has been advanced through the gastric body, deflect the tip upwards (counterclockwise rotation of the inner knob) to view the angularis incisura (Figure 4)—the fold of the lesser curvature that separates the body from the antrum. This view also provides visualization of the body/antrum and cardia.
FIGURE 4. Normal canine angularis incisura; the antrum is below the angularis, while the body is above it.
- Cardia: Further deflection in an upward direction, also called retroflexion or J-maneuver, allows evaluation of the cardia, as well as visualization of the gastroscope entering the stomach (Figure 5).
FIGURE 5. Normal canine cardia; the gastroscope is entering the stomach through the lower esophageal sphincter.
- Fundus: To evaluate the fundus, rotate the wrist in a clockwise and counterclockwise fashion to achieve a 360° view. When the scope is in the retroflexposition, withdraw the scope, rather than advancing it, to bring the tip of the scope closer to an area of interest.
- Pylorus: Advancement to the pylorus (Figure 6) can be challenging in large dogs because the insufflated stomach allows the scope to loop upon itself within the cavernous space. In these patients, withdraw air and start over if there is difficulty in reaching the pylorus.
FIGURE 6. Normal canine pylorus.
What You Will See: Gastroscopy
- Normal mucosa appears smooth and glistening, with a pink to red color. Canine mucosa is more vibrant compared to the paler pink coloration of feline mucosa.
- The antrum tends to be devoid of prominent rugal folds; if present, a pathologic process should be suspected, such as mucosal hypertrophy, inflammation, or cancer.
- Depending on the degree of insufflation, note that the:
- Rugal folds can take on a markedly different appearance, ranging from very prominent folds with minimal insuffl ation to almost nonexistent folds at full insufflation
- Color of the mucosa can change: as the stomach becomes overdistended, the mucosa may take on a blanched or white appearance.
ENTEROSCOPY
Pyloric Canal Approach
Entering the pyloric canal and descending duodenum can be challenging for the novice endoscopist. Perhaps the most important recommendation is to:
- Maintain the pyloric orifice in the center of view at all times, while slowly advancing the tip, making only small adjustments in the deflection control knobs.
- Alternatively, lock the control knobs and rely on wrist rotation to guide the tip into the orifipyloric canal—which is very tight and narrow— visualization is diminished as the tip of the scope comes into contact with the mucosa, resulting in an image of blurred pink mucosa.
- While traversing the pyloric canal, insuffl ate short puffs of air to maintain an open lumen, which appears as a shadow among the blurred pink background of the mucosa.
- If progress is not being made, back up to a point with visualization and realign the pyloric orifice to the center of the field of view.
- If multiple unsuccessful attempts are made, try a blinded technique, which can be successful but may also induce trauma to the proximal duodenum: With the tip of the insertion tube centered over the pyloric orifice, pass a biopsy instrument through the working channel into the pylorus; then use the instrument as a guide to advance the tip of the endoscope through the orifice.
Approach to Proximal Duodenum
- Once in the canal, attempt to direct the tip downward and to the right, in order for it to fall into the proximal duodenum.
- Then deflect the tip upward, and sometimes to the left, to orient the scope in the center of the lumen of the descending duodenum.
- If mastering the exact direction of deflection is challenging, make slight deflections of the control knobs, looking to advance toward a shadow (representing the lumen) in the blurred mucosa.
Approach to Caudal Duodenum
The transition between the descending to ascending duodenum and ascending duodenum to jejunum is marked by a flexure. The bend leading into the ascending duodenum is a rather acute left turn. The lumen of the duodenum is narrow, rendering clear visualization around each flexure difficult. Therefore, using a mucosal slide technique is appropriate to navigate these areas.
- Continue to advance the scope until the handpiece is at the patient’s mouth. In most cases the tip can be advanced into the caudal duodenum, but in some small dogs and cats it may be advanced into the proximal jejunum.
- Deflect the tip in the direction of the lumen and slowly slide the insertion tube along the mucosa.
- As long as the scope advances without significant resistance, continue the quest to find a lumen. Keep in mind that the duodenal mucosa is sensitive and this technique may result in superfi cial erosions and hemorrhage.
Evaluation of the Duodenum
Once in the duodenum, distend the lumen with air for mucosal evaluation.
Learn More
Part 1: Overview of Upper Gastrointestinal Endoscopy (November/December 2014 issue) for indepth discussion regarding esophageal, gastric, and duodenal abnormalities.
HISTOPATHOLOGIC DIAGNOSIS
While thorough mucosal evaluation is a valuable feature of endoscopy, a histopathologic diagnosis cannot be made from gross observation. Biopsies should always be obtained, even if the mucosa appears to be normal.
CES = cervical esophageal sphincter; GI = gastrointestinal; LES = lower esophageal sphincter; UGIE = upper gastrointestinal endoscopy
What You Will See: Enteroscopy
- The mucosa varies from pink/red to yellow/white (Figure 7). In general, dogs tend to have more vibrant coloration compared to the pale pink/ creamy color of feline mucosa.
FIGURE 7. Normal canine duodenum.
- The duodenal mucosa is textured with a rough, grainy, or even shaggy appearance; this texture represents villi.
- In the dog, you may note Peyer’s Patches, which appear as discrete, white, circular indentations or craters (Figure 8).
FIGURE 8. Peyer’s Patches in the lateral wall of the canine duodenum.
- Located in the proximal duodenum of the dog are 2 papillae (major and minor) that appear as small circular buttons that may be flat or raised; feline patients have only the major duodenal papilla, which can be challenging to identify (Figure 9).
FIGURE 9. Normal feline duodenal papilla.
Suggested Reading
Chamness CJ. Endoscopic instrumentation and documentation for flexible and rigid endoscopy. In Tams TR, Rawlings C (eds): Small Animal Endoscopy, 3rd ed. St. Louis: Mosby, 2011, pp 3-26.
Denovo RC. Selecting a gastrointestinal endoscope. In Bonagura JF, Kirk RW (eds): Kirk’s Current Veterinary Therapy, 12th ed. Philadelphia: Saunders, 1995, pp 664-668.
Matz ME, Twedt DC. Endoscopic procedures for evaluation of the gastrointestinal tract. In Ettinger SJ, Feldman EC (eds): Textbook of Veterinary Internal Medicine, 7th ed. St. Louis: Saunders, 2010, pp 443-446.
Tams TR. Gastrointestinal endoscopy: Instrumentation, handling technique, training, and implementation in practice. In Tams TR, Rawlings C (eds): Small Animal Endoscopy, 3rd ed. St. Louis: Mosby, 2011, pp 27-40.
Van Lue SJ, Van Lue AP. Equipment and instrumentation in veterinary endoscopy. Vet Clin North Am Small Anim Pract 2009; 39:817-837.
Julie Callahan Clark, DVM, Diplomate ACVIM, is a staff internist in small animal internal medicine at University of Pennsylvania School of Veterinary Medicine. She received her DVM from Tufts University and completed an internship at New England Animal Medical Center in West Bridgewater, Massachusetts, and a residency in internal medicine at University of Pennsylvania.